The 5 basic edits that, in my opinion, should always receive some attention are: sharpness, light, distracting/unwanted objects, color and composition / ratio. Below I will explain the things you should pay attention to and how to edit them in Luminar and Adobe Lightroom.
When taking pictures, it is best to capture your photo as perfectly as possible straight out of the camera. By that I mean: make sure that all settings are correct, shoot in RAW, consciously choose a composition and make sure that there is sufficient lighting. Read more about RAW photos and other file formats here>
Sharpness
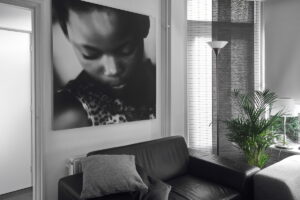
Sharpness is a key part to the success of your photo. Mainly because depth of field determines your composition to a large extent. The sharpest part of the photo draws the most attention.

 What is Depth of Field? The distance between the sharp point in the foreground and the point in the background of the photo determines the depth of field.A large depth of field gives you less depth, because it makes more of the photo sharp. A shallow depth of field blurs more of the photo. Example: In portrait photography you want the model to be in focus, especially the eyes. You want to draw attention to them. The foreground and background may be less important, so you leave them out of focus.
What is sharp and what is not therefore largely determines how the viewer looks at your photo and how they experience it. You can set the focus you want in your camera settings. Sharpness and depth of field, is a combination of several factors. For example, the set focus point, how far you are zoomed in, the shutter speed, and the ISO all contribute to the sharpness. Choose consciously what you want to show in your photo and what could be better out of focus.

An unfocused photo is not pleasant to look at.

This photo is correctly focused. It is a pleasant image to look at.
A wrongly focused photo is often not pleasant to look at. It just doesn’t feel right. However, this does not necessarily mean that the photo is completely useless. By editing in professional or otherwise editing software, you can save a lot of photos. A really mis-focused photo may still be usable in a small format for social media or a small Xpozer Print.
View Luminar’s tutorials on adjusting sharpness in your photo here>
Learn how to sharpen your photo in Adobe Lightroom here>
Light
A photo was originally a recording of light on a sensitive plate. A similar process occurs with modern photography. Technology is advancing, as cameras get smaller sensors increase in sensitivity. How much light your camera needs to produce a good photo depends on the camera sensor. Light is not only important from a technical perspective. It can also determine the look and atmosphere of your photo. Shooting at sunrise and at sunset (golden hours) gives you warm, yellowish light. You can simulate this effect through editing. You can also reduce and darken shadows as well as reduce overexposure, everything is possible ;).
View Luminar’s tutorials on adjusting light in your photo here>
Learn how to edit light in Adobe Lightroom here>
Distracting Objects
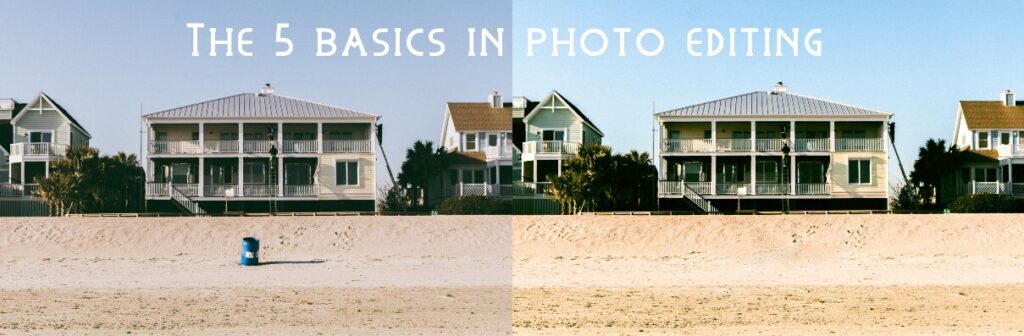
Nothing is more annoying than distracting objects in your photo. Below is a picture of a quiet beach. What immediately stands out: the blue trash can in the middle of the screen. Depending on the subject of your photo shoot, you most likely don’t want it in your photo. Fortunately, it is quite easy to remove such items from your photo. Below is the result of 5 seconds of work. The recycle bin has already been removed, now it is just a matter of updating some details and it is as if the recycle bin was never there.
")
View Luminar tutorials on removing distracting objects from a photo here>
Learn how to remove distracting objects with Adobe Lightroom here>
Color
What edits get you the correct colors? Just like light, color is a very important mood determining factor. Bright colors make the image more vibrant, matte, gray colors make it a bit gloomy. By playing with color you can create dramatic differences in the ambiance. You can choose the following color adjustments in almost all editing software:
- Brightness
- Contrast
- Vibrance
- Exposure
- Hue
These are also the most important edits you can make in the field of color.
View the Luminar tutorials on how to edit colors in your photo here>Learn how to adjust colors in Adobe Lightroom here>
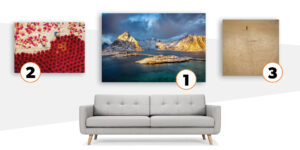
Composition & Ratio
What edits can you make to improve the composition? The composition of your photo is very important for its success. Too much or too little negative space around your subject can unbalance the photo.The ratio is the aspect ratio. If you want to order your photo on Xpozer, you choose an Xpozer format. The ratios we can print are 1: 1, 1: 2, 1: 3, 1: 4, 1: 5, 2: 3, 3: 4, 5: 4 and 16: 9. This is purely about the proportions of the long and short sides of the Xpozer. We offer different sizes within these ratios.Sometimes a photo looks better in a different aspect ratio than in which the photo was shot. You can then crop afterwards to achieve the desired ratio. In this way, your composition is often easy to adjust afterwards. It differs per photo what the best crop is.


View the Luminar composition tutorials here>Find out how to adjust the composition and ratio of your photo in Adobe Lightroom here>
What Have You Learned?
We distinguish 5 basic operations. To give your photo more atmosphere, you usually adjust light, color, composition and sharpness. In addition, you can delete distracting objects to finish the photo. If you do these 5 edits correctly, you are already well on your way to the perfect photo! Good luck with practicing!
It’s always OK to ask for help 🙂
Are you unsure about the quality of your photo? Request a FREE Photo Check! Our Photo Xperts will check out your photo for free and they can tell you if your photo is ready for print!
Are you already an expert in taking photos, saving them and editing them? Order your best work on Xpozer and enjoy your photos every day!