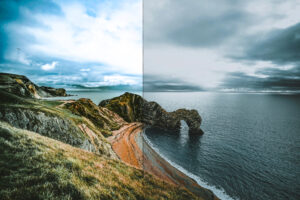
Colors make and break our photos! We want our grass to be green, the skies to be blue and skin tones to be natural. Yet sometimes your camera might just capture it differently. By using the correct white balance your colors will always look vivid and natural.
What is white balance?
White balance is the color your camera will read as white and according to this info, the entire image will be adjusted. This makes the white balance integral to a good image. Making sure that white is actually recognised as white by your camera is key to making your photo look natural. Otherwise you will get a blue or yellow looking photo.
You can use the settings on your camera to set the correct white balance but, if you shoot in RAW, you can easily adjust this in the likes of Lightroom, Luminar or Photoshop.
The influence of light on white balance
Your brain automatically adjusts to new lighting, making sure you see all colors naturally. Your camera unfortunately doesn’t. It will capture the light as if you where in the same lighting conditions as before. This causes your camera to capture the colors in different kinds of temperatures. Colors are indicated in a temperature (Kelvin). The higher the temperature, the more blue the light and the lower the temperature, the more yellow or more red the light. Daylight (5600K) for example has a higher temperature than an incandescent lamp (2800K).
Correcting Your White Balance
There are several way to correct your white balance, here are some simple steps you can take in Lightroom to correct your white balance!
1: Adjusting the temperature slider
Using the temperature sliders you can slide the temperature and hue up or down and immediately see the difference.
You can slide to the left or to the right, by sliding it to the left the photo gets more blue (cooler) and by sliding it to the right the photo becomes more yellow (warmer).
The disadvantage of temperature sliders is that it is not very accurate and more based on your own feeling. The advantage is that you can make very small changes which may suit your own preferences better.
2: Selecting a preset
Lightroom has built-in white balance settings that closely resemble the white balance settings that you would find in your camera. If your camera did not automatically choose the right white balance, in Lightroom you can choose what kind of light you had while taking the photo and Lightroom will change the white balance according to the preset that you chose. For example, you could choose the setting “Daylight” if you had sunlight during shooting or “Tungsten Light” if you had sunlight shining into your lens while shooting.
Step-by-step: Adjusting the White Balance With a Preset
- Open Lightroom
- Open your photo in the Develop mode
- Right of the Eye Dropper you see WB: Custom. Click on “Custom”.
- Think about what kind of light you had while taking the photo
- Choose the preset that fits the type of light that you had while taking the photo. For example if you had cloudy weather while photographing outdoors you can choose ‘Cloudy’.

3: Choosing a Neutral Color or Using a Gray Card
Choosing a Neutral Color
A more precise way of correcting the white balance is finding a neutral spot in your photo and pointing the white balance selector on this specific point. Lightroom will then adjust the white balance to this point assuming this point you have chosen is white.
In a portrait the white in the model’s eye or their teeth is a good place to start correcting your white balance.
Lightroom can determine the deviation based on temperature/tint and perform the correction on the entire color range. Because it can be difficult to find something gray in the photo, there are special gray cards. A great little tool often used by studio or portrait photographers to get the perfect white balance (you can also use them with other types of photography). Gray cards are little cards with a color of 18% gray, this is a middle gray color which is standardly used in photography camera’s and programs. Based on this you know which color should be gray, after which you can correct the picture with one click.
Step-by-step: Neutral Color
- Open Lightroom
- Open your photo in Develop mode
- Click on the Eye Dropper in the right frame diagonally above the temperature.
- Click on a pixel in the picture that has a neutral color
- Lightroom now automatically sets the correct white balance
Using a Gray Card
The best way to use gray card is by first shooting a photo with the card followed by one without the card. This way you can use the correction of the first photo to correct your second photo as well. This way you prevent that a gray card is visible on your photo.
If you want to learn more about using gray cards, Emily from Cozy Clicks explains it very clearly in this video!
Step-by-step: Gray Card
- Open Lightroom
- Open your photo with the gray card in Develop mode
- Click on the Eye Dropper in the right frame diagonally above the temperature.
- Click on the gray card
- Lightroom now automatically sets the correct white balance
- You select the photo which you just edited and the photo that you would like to be the final image
- Right below, next to Reset you can see the button ‘Sync’ if you click on this you get a window with synchronization settings. Be sure to only tick ‘White Balance’.
- Done that? Hit synchronize and your final image has the same white balance as the image with the gray card.
Hopefully these tips will help you create the best photos! Show us your best creations by using the tag #Xpozer on Instagram or by tagging us @Xpozer.
Need more editing tips? You can find them here!