We cannot say it enough: if you want to enjoy your photography more, print your photos. When you’ve taken the perfect photo, you want to stare at it for hours and let your mind wander back to that perfect moment you clicked your shutter button. That is why we love our photo prints. And the bigger they are, the more impact they have! We understand that it can be quite scary to enlarge your photo for the first time. We offer many different print sizes, and you might think that your photo isn’t good enough or you might have doubts on how to save your file for this large print size. When editing and saving your file, keep our tips in mind, and you’ll be fine, promise!
Prepare the file before you print!
How to prepare your photos to be printed? Follow our tips and your photo will be ready in no-time!
1. Choose a print size before you edit
Choose the print size you would like to hang on your wall. Leave a bit of room on all sides of the print, so it doesn’t look crammed. Be sure to choose a size that is large enough to make sense in the space you’ll hang it. A small print above a huge sofa looks lost and weird. An enormous print above a tiny cupboard might look out of balance, too.
Make note of the ratio of your chosen photo. If your original photo size has a 3:2 ratio, and you order a 4:3 ratio print, your photo will have to be cropped. That means part of your photo will have to be cut off, which affects the composition. Most smartphones shoot in 4:3 ratio and most DSLR cameras shoot in 2:3. But of course, you should check your camera’s settings before shooting.
No need for editing? Crop your photo before uploading it to our website, or crop it during the ordering process. That’s up to you.
2. What is the minimum resolution needed for photo prints?
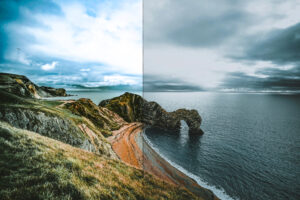
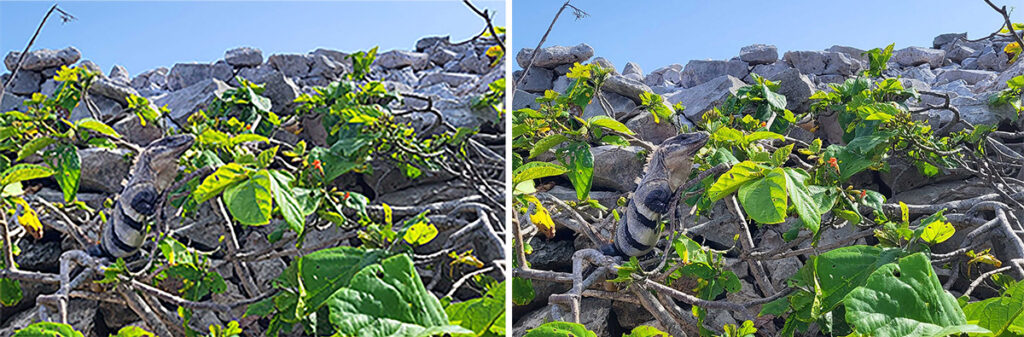
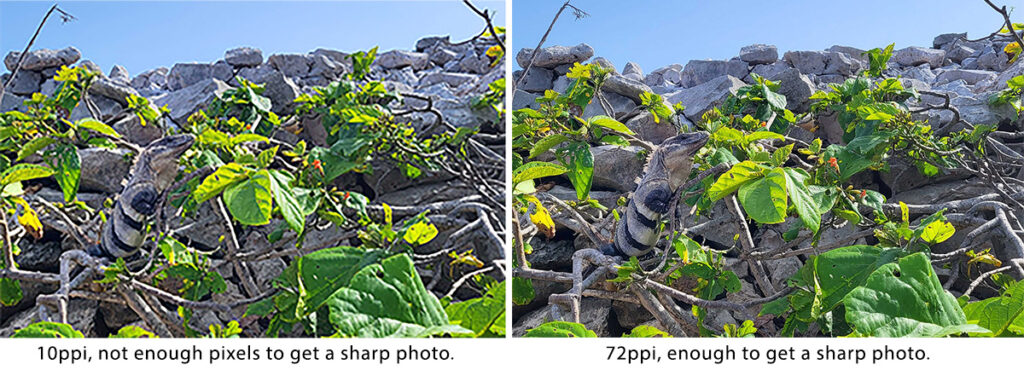
You’ve taken a great photo, which is sharp in the exact right spot, and the colors are perfect. You’ll want that to translate to the print, of course. To make sure your photo will be sharp on a large print, check its size first. The size could be 4898×3265 pixels. That, however, doesn’t say anything about the quality of the photo. The pixels could be huge, which wouldn’t result in the best photos. What you should also know, is the PPI (pixels per inch) value. The PPI value indicates pixel density. If there are many points in one inch, and each pixel has their own colours, it is possible to create the most detailed photos. Click on the example photos below to see the difference between a 20 PPI photo and a 72 PPI photo.


Our advice: A PPI value between 70 and 80 is fine for a great print. More PPI is possible, however our system works with a 10MB file size maximum. The higher the PPI value, the bigger the file.
3. Don’t forget the final check!
Open your file in Photoshop (or other editing software) and zoom in to 100%. Is your photo sharp enough? Then it is perfect for print.
A little secret: a little blurriness is fine (read on to see why).
4. Doubts about your photo?
If you’re in doubt, note that our sophisticated upload and print system fixes sharpness issues when necessary. That way, even a photo with a PPI of 45, could still turn out good enough.
Our special AI creates sharpness when you’re lacking PPI
I would always recommend a PPI of 70+ for most prints. For a large print that is only viewed from a large distance (for example 10ft+), the PPI may be lower and adjusted by AI, for equally good results.
Our final piece of advice: order your prints at Xpozer.com. You’ll love it. Seeing your photo on the wall brings you back to that very moment you shot it. That perfect holiday, or maybe the moment you and your partner said ‘I do’? Keep those special moments in your life to enjoy on a daily basis. It’ll give you so much joy!