A preset is a collection of settings for your photo editing program. A preset is programmed for specific software. You could have a preset specifically for Adobe Lightroom, for example. A preset can be added to your software, to be able to do some standardized editing with just the click of a button. After using the preset, you are still free to do even more editing. You could use it as a good start in the desired direction. You can make your own presets, or install presets made by others. If you don’t have the software the preset was programmed for, you are not able to use the preset to edit your photos.
Luminar Looks Guide for Mac & Windows
In Luminar, presets are called Looks. Using Luminar Looks is as easy and fast as Luminar itself. The steps for both Mac and Windows follow the same formula.
Step 1: If necessary, unzip the file in which you received the Luminar Looks.
Step 2: Select all looks in your folder and select all the looks then press CMD + C to copy the files. (CTRL + C if you’re on Windows)
Step 3: Open Luminar 3, make sure that your Looks panel is visible. You can find this under the View – Hide / Show Looks Panel tab
Step 4: Go to the File tab and select “Show Luminar Looks Folder”.
Step 5: Press CMD + V (CTRL + V on Windows) to paste your new Looks into the Luminar Looks folder.
Step 6: The looks can be found in the category: “User Luminar Looks”. Select the desired look and adjust it to taste.
Watch the video below if you want to see how we got it done:
Lightroom Presets Guide for Mac & Windows
There’s only a slight difference in importing Lightroom Presets between the two operating systems, which occurs in step 3.
Step 1: If necessary, unzip the file in which you received the presets.
Step 2: Open Lightroom
Step 3: Mac: In the menu, click Lightroom > Preferences > PresetsWindows: In the menu, click Edit > Preferences > Presets
Step 4: Click on the box “Show Lightroom Presets Folder”
Step 5: Select the Lightroom folder and click through to the Develop Presets folder.
Step 6: Copy the Custom Preset folder into the Develop Presets folder
Step 7: Restart Lightroom and get your photo ready for print! You can find the new presets in the “user presets” category. Note that the presets are only visible in the Develop tab.
Using and adjusting presets
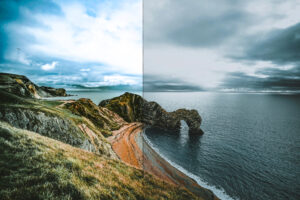
Select your Look or preset and then adjust the settings slightly to your taste. See below how we adjust this photo using a preset.
Additional editing
Even though the preset does much of the ground work, most photos have specific things that need some special attention. Here are some general tips to get the best out of your photo.
- The exposure of your photo is essential for a beautiful print! When a photo is too dark or too light, you lose detail during printing. That would be a real shame.
- A spotless photo is a dream of every photographer. Unfortunately, we sometimes find ourselves in a situation where this is not the case. Presets and Looks don’t get rid of these but, luckily programs such as Luminar and Lightroom offer a great tool for spot removal.
- Did you know contrast is essential to a striking image? In fact, it’s crucial. Contrast adds depth to an image, making it more attractive. It invites the viewer to really look at a photo and the story behind it. For example, you’ve got a beautiful portrait and you want to convey the feelings of your subject to the viewer.