Premium smartphones have awesome cameras nowadays, and their photos can even be enlarged and printed to use as wall decoration. In a battle for the best quality print, between the iPhone 12 Pro Max and the Sony A6000, can the iPhone hold its own? We’ve put it to the test.
How did we set up this test?
The first thing we had to figure out was how the focal length of the iPhone 12 Pro Max compared to the cameras in our camera bag.
The iPhone 12 Pro MaxiPhone 1x = 26mm
iPhone Portrait (2.5x) = 65mm
Not everyone has an expensive professional camera so we went for the Sony a6000 with its kit lens. My favorite option for travel and street photographyThe Sony a6000 + 16-50mm f3.5-f5.6 (€500)
26mm = 17mm
65mm = 43mm
We decided to test a few different categories and score each photo on things like sharpness, color and detail. We took a cityscape style photo of the Binnenhof, a portrait of a friend and a photo at night time using long exposure.
Cityscape

iPhone 12 Pro Max 1x (26mm)

Sony a6000 + 16-50mm f3.5-f5.6 at 17mm (=26mm)
How We Got the Shot
We got this picture during a walk around the city centre. With the iPhone all we had to do was select the RAW option, choose our focus point and shoot, there’s not loads of room for creativity whereas with the a6000 you’re able to adjust your settings to suit your creative needs and take the shot. Because this was a super sunny day it was easier to compose this photo through the viewfinder on the camera, we could barely see what we were doing on the iPhone screen.
The Results
We were a bit blown away by the results as the sharpening software on the iPhone meant the details in the iPhone photo were much sharper than that of the camera. However, the details in the shadows and highlights in the photo from the a6000 retained more details and the colors are more accurate to what it was on the day.
|
Feature |
iPhone |
Sony |
|---|---|---|
|
Sharpness |
★★★★★ |
★★★★☆ |
|
Colors |
★★★★☆ |
★★★★★ |
|
Contrast |
★★★☆☆ |
★★★★☆ |
|
Highlights & Shadows |
★★★☆ |
★★★★☆ |
|
Total |
15 x ★ |
17 x ★ |
For us, the camera is the preferred option, it’s just that bit more precise. However there is nothing wrong with grabbing a quick pic with your iPhone. At the end of the day it’s the memory that matters.
TIP: If you want more control over your iPhone camera, use an app like Hallide that gives you control over the same settings you’d have on your camera.
Portraits

iPhone Portrait (2.5x) = 65mm

Sony a6000 + 16-50mm f3.5-f5.6 43mm (=65mm)
How We Got the Shot
We had very little time to get this photo, maybe 10 minutes tops, so being able to just select Portrait mode and shoot away was great. That said we’d already planned the settings we wanted to use to get this portrait shot. It was very windy and we were trying to get the windswept hair look, we do feel this was much easier with the iPhone.
The Results
To get this photo on the iPhone we used the iPhone’s portrait mode, the great thing about this is it softens the background, meaning the focus is truly on the person in front of your camera. However, we did find that the automatic softening on her face caused some loss of detail in her eyebrows. The eyes were sharpened by the software as well, which doesn’t have to be a bad thing.
|
Feature |
iPhone |
Sony |
|---|---|---|
|
Sharpness |
★★★☆☆ |
★★★★★ |
|
Colors |
★★★★☆ |
★★★★★ |
|
Contrast |
★★★☆☆ |
★★★★☆ |
|
Highlights & Shadows |
★★★★☆ |
★★★★★ |
|
Details |
★★★★☆ |
★★★★★ |
|
Total |
17 x ★ |
24 x ★ |
Where the iPhone didn’t do that well is the colors, the color on the model’s lips is almost neon-like and her skin color is slightly oversaturated. We also didn’t like what the iPhone did to the color on her sweater. The a6000 again has more realistic and accurate colors, the shadows and highlights look better as they looked a bit flat on the iPhone. The details in skin texture and the brows is also more realistic. However when we received the prints my coworker couldn’t tell right away which photo was shot with what device.
Long Exposure at Night (without Tripod)

iPhone 12 Pro Max 1x (26mm) 1 sec exposure

Sony a6000 + 16-50mm f3.5-f5.6 at 17mm (=26mm) 1 sec
How We Got the Shot
The main thing here, we didn’t use a tripod, there was nowhere to put it where we could stabilize it because of the ice and we were freezing so trying to set it up wasn’t much of an option. Now if you don’t have a tripod ready and you’d like to shoot a long exposure, go for the iPhone. Because the iPhone has more software, it also has more stabilisation. There are 2 options for the long exposure on an iPhone. Live mode and the night mode. If you want light trails go for Live mode, otherwise opt for the night mode.
The Results
The difference here is quite obvious, the sharpening software and noise reduction in the iPhone makes for a much clearer photo, although we did feel like the treetops got a bit too faded and the clouds look a bit odd. We were really surprised at how well the iPhone does in the dark.
|
Feature |
iPhone |
Sony |
|---|---|---|
|
Sharpness |
★★★★☆ |
★★★☆☆ |
|
Colors |
★★★★☆ |
★★★★☆ |
|
Contrast |
★★★★☆ |
★★★★☆ |
|
Highlights & Shadows |
★★★★☆ |
★★★★☆ |
|
Details |
★★★★☆ |
★★★☆☆ |
|
Total |
20 x ★ |
18 x ★ |
We think the main thing here is the fact we didn’t use a tripod as ours was broken and we didn’t want to risk my camera falling off. This means that the shot taken with the Sony (even though we did try to stabilize it) has a lot of motion blur where the iPhone’s AI compensates for movement and sharpens the image. If you have a tripod and you really want to capture a cool long exposure, go for the camera. Just make sure you really take your time for it and know your settings. That said there’s nothing wrong with having some fun and experimenting with the iPhone 12 Pro Max’ night time mode, especially since in this specific image it came out stronger than the camera.
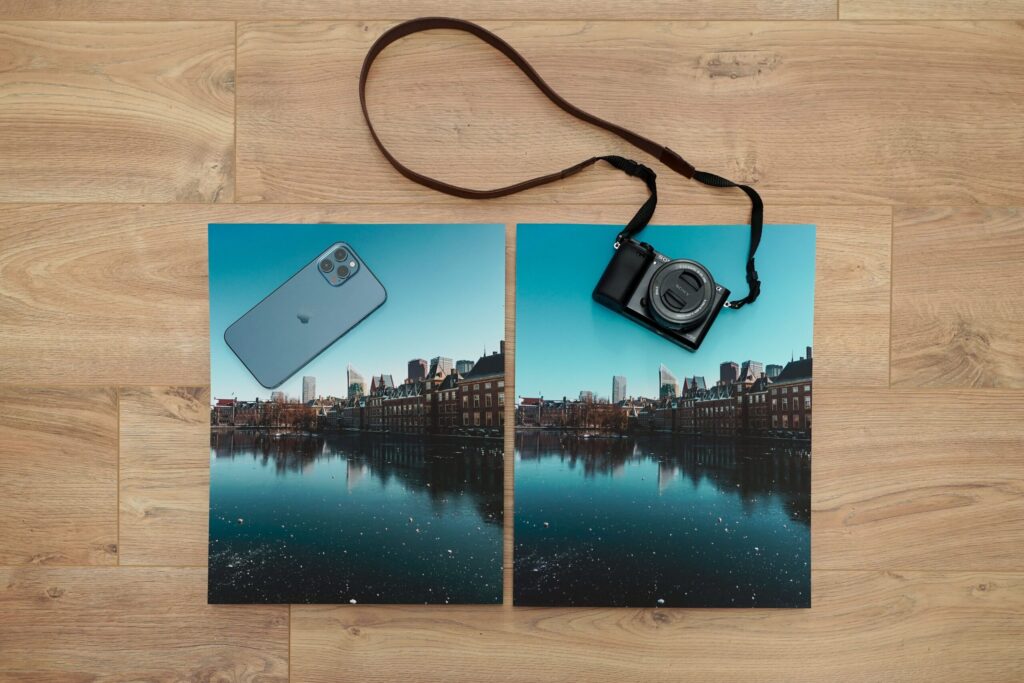
Which camera is best for a big photo print?
Sometimes you just have to go big and of course, this is the ultimate quality battle so we had to print big! Before printing we checked the resolution and quality of the photos, this showed that the Long Exposure had too much grain to be printed in such a large size so we decided to only print the cityscape and portrait.
Can you see which is which?


The Devil’s in the Details
From a distance there doesn’t seem to be much difference. However, if you look at it close up, you can clearly see the pixelation in the iPhone Print, while the Sony Print shows some slight abberation, but is definitely still a clear image. The best option here is definitely the Sony Print as the pixelation is something you just don’t want in such a large Print.

iPhone 12 Pro Max 1x (26mm)

Sony a6000 + 16-50mm f3.5-f5.6 at 17mm (=26mm)
Now what happened with the portrait prints is interesting. When you get up close to the iPhone Print you can see the eye is over-sharpened and the colors in the eye are slightly too bright whereas in the Sony print the eyes look natural and fairly sharp. However from a distance the iPhone print really makes here eyes pop and really looks sharp. The Sony print doesn’t have this effect and has you focussing more on the overall photo. We would go for the Sony Print as the colors are a lot more natural but there’s definitely nothing wrong with the iPhone Print.


Tips for the best prints
- Always edit in lightroom/photoshop or luminar even when shot on phone.
- The Lightroom app is free on mobile and we’ve got new presets on the way!
- Compose for print, do not crop
- Avoid clipping
- Ratio (think ahead)
Can an iPhone really replace a camera?
In many cases, the answer is yes. However it does depend on a few things. We’ve summed up the most important points to take away from this ultimate quality battle:
- If you use a smartphone make sure it’s one of the more recent models. (Think iPhone X and up)
- Whether you can print an iPhone photo also heavily depends on the circumstances like lighting and whether you used your zoom or not.
- Some Samsung phones have different ratios to what we offer so you might have to crop.
- If you shoot with an iPhone we wouldn’t advise printing larger than 24×32.
- ALWAYS have one of our Xperts check your photo before ordering. (especially when taken with a smartphone)
- If you have the time to set up a shot and master your settings always choose your camera.
- Both devices have pro’s and cons, at the end of the day you have to decide what’s best suited for the situation.
When it comes to print if you don’t go too big you can hardly see the difference. The iPhone has a lot more software to help you get the shot you want and sometimes getting the shot is more important than how you got it. If you want to print big and have lots of details, go for your camera and take your time to get the shot. At the end of the day you want the same end result, to be able to relive that special moment time and time again.